RemoteRF
Software-defined radios (SDRs) have proven to be valuable tools in both education and research thanks to their reconfigurability and versatility, yet remain out of reach for many due their cost. Integrating SDRs into a typical undergraduate course on communications, for instance, could easily cost tens of thousands of dollars if each student were provided exclusive access to their own device(s). While purchasing only a handful of SDRs for students to share in laboratory sessions is a feasible alternative—akin to how many engineering labs are held—it also has its fair share of associated costs and severely limits the access students have to the devices. These barriers to entry have prevented many instructors from integrating SDRs into their courses and many researchers from harnessing SDRs in their research.

To address these challenges, the Wireless Lab at UCLA has developed RemoteRF, a platform that allows individuals to remotely interface with SDRs via an internet connection, as illustrated above.
In its current form, a server is housed in the Wireless Lab at UCLA, connected to which are multiple SDRs.
Each of these SDRs may be remotely accessed via Python and a simple command line interface.
To begin using the SDRs connected to RemoteRF, you must download a package via pip and then create an account through a command line interface.
After making an account, you can make a reservation for a particular SDR, allowing you (and only you) to access that SDR during your reservation period.
Upon making a reservation, a token will be issued to you, which can then be inserted into your Python code, allowing you to remotely access the SDR as if it were physically connected to your personal computer.
Behind the scenes, all commands and data will be transferred between your personal computer and the SDR over the network via the RemoteRF platform.
If at anytime you believe the RemoteRF server is down or if you encounter any bugs, please post the issue on Piazza. You may also submit a bug report.
What is a Software-Defined Radio?
“Software-defined radio” is a term often used to describe a transmitter, receiver, or transceiver which can be highly reconfigured. Simply put, many of the device’s parameters can be controlled and configured dynamically through software. SDRs are thus very convenient for hobbyists, researchers, and engineers, since one platform can be used flexibly for a wide range of tasks. This is in contrast to application-specific transceivers, which are far less flexible yet often much more optimized and efficient than SDRs. Most SDRs have many tunable parameters, with perhaps the most relevant often being:
- transmit carrier frequency
- receive carrier frequency
- transmit gain (i.e., transmit power)
- receive gain
- baseband sampling rate
It is perhaps easiest to think of an SDR as a transceiver onto which you can push complex baseband samples (via USB) for it to transmit and from which you can pull complex baseband samples that it received. As such, you can do all the relevant baseband digital signal processing on a host computer (often in Python or MATLAB), leaving the actual upconversion and downconversion (and other RF front-end functionalities) to the SDR. This is illustrated in the block diagram below, depicting the Pluto SDR (described next) interfaced with Python.

Which SDRs Are Connected to RemoteRF?
Currently, RemoteRF has connected to it multiple Pluto SDRs, manufactured by Analog Devices. These relatively affordable SDRs were designed to be simple and with education in mind. Each Pluto SDR is based on the AD936X series, a set of RF integrated circuits that are highly controllable through software. Out of the box, the Pluto SDR can be tuned to operate at carrier frequencies ranging from 325 MHz to 3.8 GHz and can transmit and receive signals with up to 20 MHz of (effective) passband bandwidth. Each Pluto has 12-bit DACs and ADCs to generate and sample baseband signals. The Pluto SDR has a transmitter and receiver, each with its own SMA port.

There are nine Pluto SDRs currently connected to RemoteRF. Two of these nine Pluto SDRs (devices 0 and 1) are configured in a loopback fashion, where each device’s transmit port is directly cabled into its own receive port (i.e., a loopback configuration). This will allow the device to receive a nearly perfect copy of its transmitted signal, which can be useful for familiarizing oneself with the Pluto SDR and for testing/debugging purposes. The other seven Plutos (devices 2–8) have antennas connected to their transmit and receive ports—i.e., an over-the-air (OTA) configuration. These antennas are resonant at and around 915 MHz. Given the transmit antenna and receive antenna are so close to one another, the received signal will also be a near-perfect copy of the transmitted signal but likely not quite as clean as that with a loopback. Devices 2–4 each have a band-pass filter (BPF) placed just before their transmit antennas. This BPF is centered at 915 MHz and has a passband that spans from 900 MHz to 930 MHz. Outside of this region, the transmitted signal will be attenuated and undesired effects may be encountered. To summarize, the current configuration of each device connected to RemoteRF is as follows:
- Device 0: Pluto SDR, loopback
- Device 1: Pluto SDR, loopback
- Device 2: Pluto SDR, over-the-air (OTA + BPF)
- Device 3: Pluto SDR, over-the-air (OTA + BPF)
- Device 4: Pluto SDR, over-the-air (OTA + BPF)
- Device 5: Pluto SDR, over-the-air (OTA)
- Device 6 Pluto SDR, over-the-air (OTA)
- Device 7: Pluto SDR, over-the-air (OTA)
- Device 8: Pluto SDR, over-the-air (OTA)
Getting Things Set Up
Network Connection
In order to access RemoteRF, you need to be on the UCLA network.
UCLA_WIFIhas proven to work.eduroamhas proven to work.UCLA_WEBdoes not appear to work.
We have not yet tested wired connections across campus.
When not physically on campus, you may also use the UCLA VPN.
ssl.vpn.ucla.eduhas proven to work.stssl.vpn.ucla.eduhas also proven to work.
Python
To use RemoteRF, you need Python 3.10 or newer. Only Python is currently supported—no other programming languages or software tools are supported.
You will also need the Python library matplotlib for its plotting functionality. This package can be installed using the following.
pip install matplotlibFor those using conda, you can create a new sdr environment with the following.
Those not using conda may ignore this.
Those using another environment manager may create a custom environment similarly.
conda create -n sdr python=3.10 matplotlibIf you used conda to create a new sdr environment, activate it with the following.
conda activate sdrPackage Installation
Before using RemoteRF, you will need to install our custom package from pip using the following.
pip install remoterfShould any updates be pushed to this package, you can upgrade your installation with the following. It is recommended that you run this frequently, just in case updates have been made to RemoteRF.
pip install remoterf -UIf you run into errors with RemoteRF, it is encouraged for you to first run the above command to ensure your package is the most up-to-date.
Package Configuration
After installing RemoteRF’s pip package, it needs to be configured by running the following in the terminal.
remoterf -c -a 164.67.195.207:61005This simply sets the network address that the remoterf package points to.
Making an Account and Reserving an SDR
Making an Account
To begin using the RemoteRF platform and accessing its SDRs, you must first make an account.
With the remoterf package installed, simply run the following in your terminal.
remoterf --loginIt will ask you to either enter l to login or r to register.
When accessing the platform for the first time, enter r to register an account.
When registering an account, you will be prompted to enter the following information:
- An enrollment code provided by the instructor.
- A username containing at least three characters.
- A password.
- Your email address.
If you forget your password, you will need to create a new account, as there is no way for us to retrieve or reset it at this time. To do so, you will need to obtain a new enrollment code from the instructor.

Logging In
Any time you access the RemoteRF platform after making your account, enter l to login.
Upon successfully logging in, you should be greeted with a landing screen similar to what is shown below.
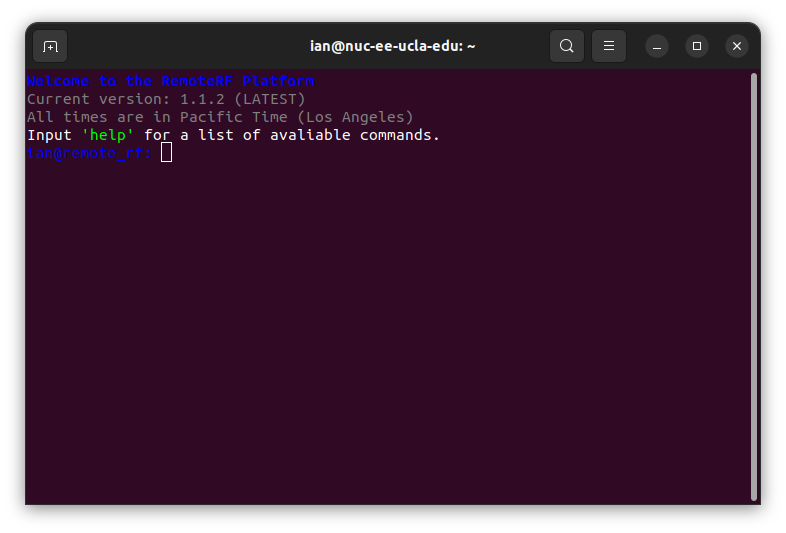
Notice that, below the greeting message, the current version of your RemoteRF package is listed, along with if it is the latest version or if it is outdated.
If it is outdated, we recommend updating the package by running pip install remoterf -U.
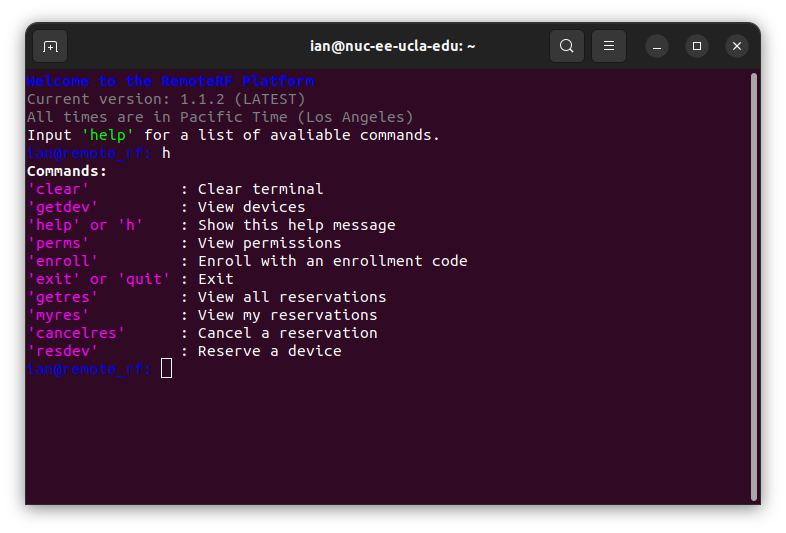
Typing help or simply h will list all allowable commands, similar to that shown below.
Seeing Which Devices Are Online
To see which devices are currently connected to the RemoteRF platform and functional, simply type getdev.
This will produce an output similar to what is shown below.
Note that all devices are listed regardless of their reservation status.
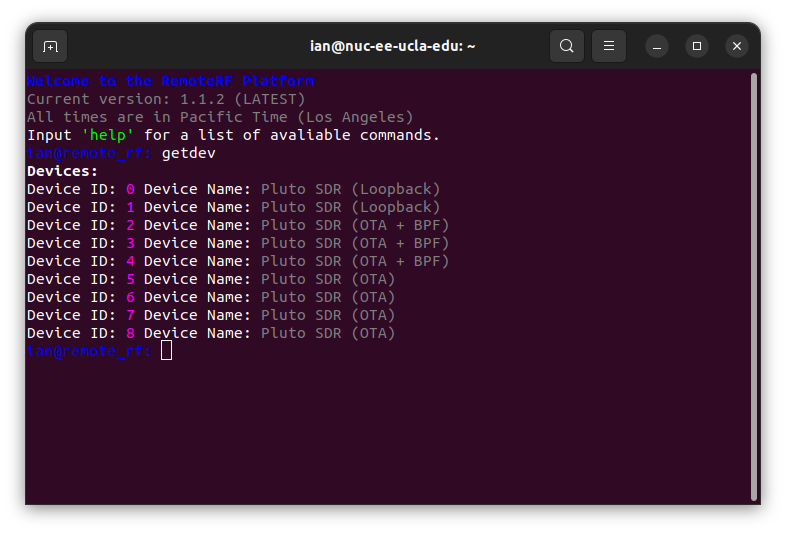
In this particular case, nine Pluto SDR devices are connected to the RemoteRF platform. Each device is identified by its index and name. Here, we have denoted which Plutos are in a loopback configuration (devices 0 and 1) and which are over-the-air (OTA) (devices 2–8). In addition, we have denoted which Plutos have a band-pass filter installed just before their transmit antenna by “OTA + BPF”. This band-pass filter is centered at 915 MHz and its passband extends from roughly 900 MHz to 930 MHz. Transmitting outside of this range may have undesired effects.
User Permissions
A user’s account permissions are determined based on their enrollment code(s) and can be viewed by typing perms, as shown below.
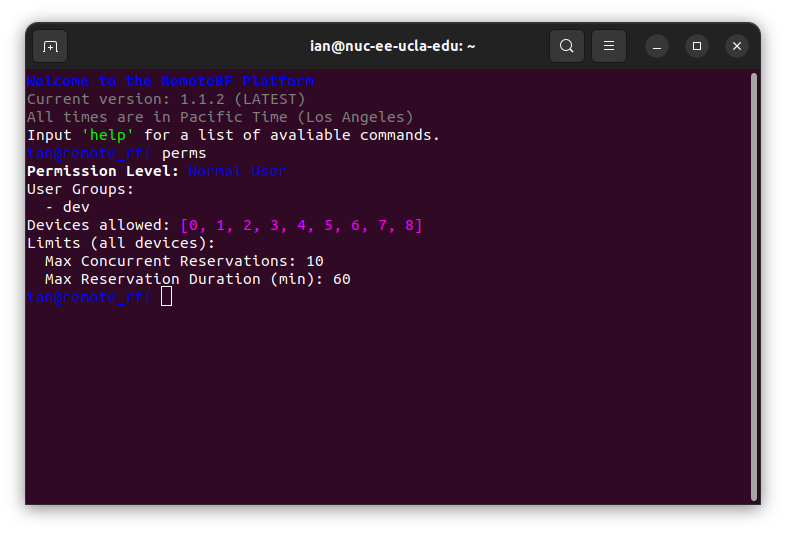
In this particular case, the above user can hold up to 10 active reservations, regardless of whether or not they are concurrent, and each reservation is 60 minutes long. For students using a course-based enrollment code, it is likely that they have been given permission to hold up to only 3 active reservations, each of which is 30 minutes long.
Reserving an SDR
RemoteRF was created to be an automated solution that allows many users, such as students in a class, to systematically share access to a limited number of SDRs.
This is accomplished through RemoteRF’s reservation system.
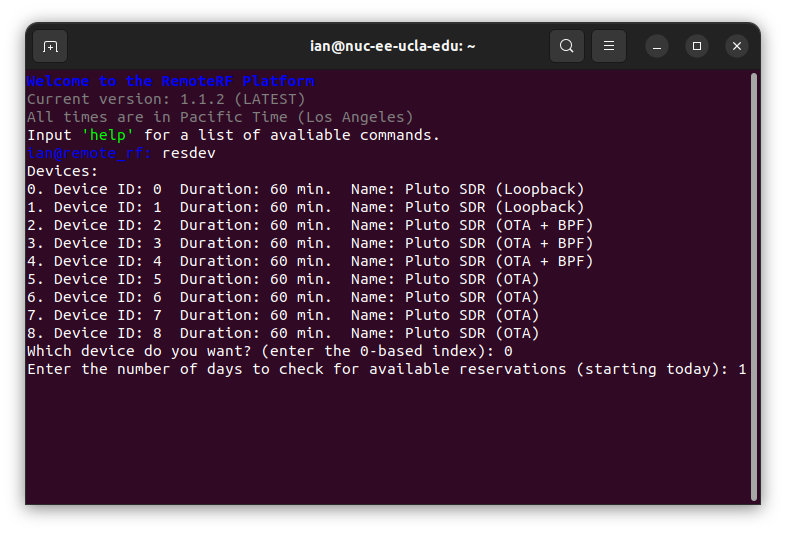
To reserve an SDR, type resdev once logged into the RemoteRF platform, which will list all available devices similar to the output produced by getdev.
Users will first be asked which device they wish to reserve, which can be indicated by entering the device index.
Enter 0 for device 0, for example.
Then, users will be asked to enter the number of days into the future to show when listing open reservations.
Enter 1 to display open reservations for today, for instance.
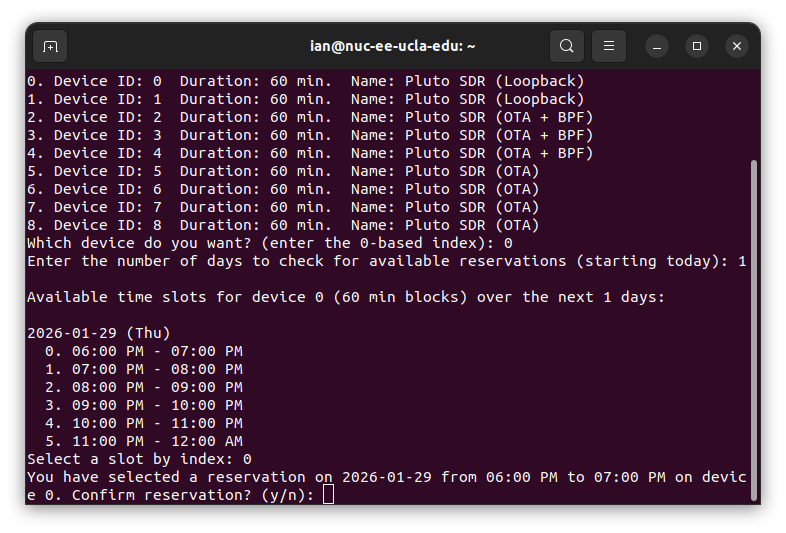
Afterwards, a list of time slots will be shown to the user, each of which corresponds to a time slot that the user may reserve the particular device they are inquiring about.
For example, as shown in the output below, upon inputting resdev at around 6:05 PM on January 29, 2026, the following 60-minute-long options were listed in chronological order, with start and stop times shown.
Based on a particular user’s permissions, reservation durations may differ from what is shown below.

A user can make a reservation for a particular time slot by entering its index, e.g., input 0 to reserve time slot 0.
The system will then ask to confirm the selection.
To do so, enter y.
To abort this reservation, enter n.
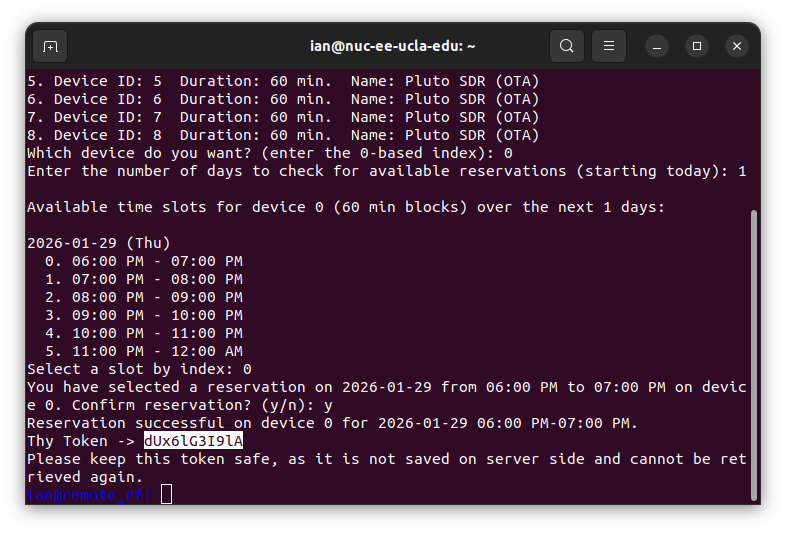
After confirming the reservation, a unique token will be issued to the user.
For instance, in the above output, the token was dUx6lG3I9lA.
This token will be needed to access the reserved SDR through Python, as we will see shortly.
This token will allow only the user holding the reservation for a particular SDR to access that SDR during the reservation time slot.
Be sure to copy the token (avoid Ctrl+C) and keep it safe, as it is not saved on the server’s side and cannot be regenerated or retrieved if lost.
Canceling a Reservation
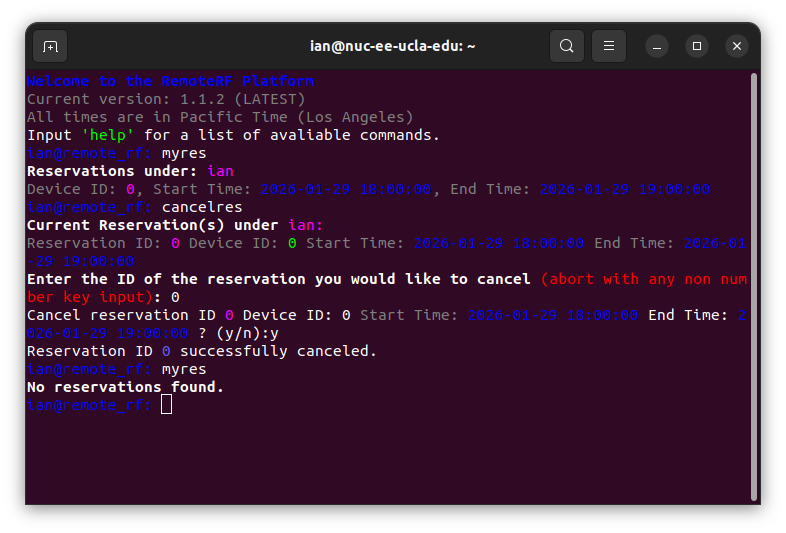
To cancel a reservation that was made (which is useful if an issued token is lost), you can use the command cancelres.
As illustrated below using the myres command to view active reservations, canceling a reservation amounts to simply indicating which of the listed reservations a user wishes to cancel.
Here, initially one reservation was held and then none after canceling the lone reservation.
Using the RemoteRF Platform
Now that we have walked through how to make a reservation and obtain permission (via the issued token) to access a particular SDR at a particular time, let us now go through the necessary steps to actually interface with that SDR via the RemoteRF platform.
Two Line Changes — That’s It!
In creating the RemoteRF platform, our goal was to make it as seamless as possible to convert a traditional Python script that was written for locally interfacing with a Pluto SDR (via USB) into one which can be used to remotely interface with one via the RemoteRF platform. In this vein, we have made it such that using the RemoteRF platform requires only two line changes, compared to a traditional Python script that locally interfaces with a Pluto SDR. To illustrate this, below shows what a traditional Python script starts off with in order to connect to a Pluto SDR which is connected directly to one’s computer via USB.
# for locally interfacing with Pluto via its IP address
import adi
sdr = adi.Pluto("ip:192.168.2.1")
In contrast, these two lines should be updated to the following when remotely interfacing with a Pluto SDR via RemoteRF.
Notice that the token issued upon making a reservation should been inserted when calling adi.Pluto().
This token is used by the RemoteRF platform to validate a user’s reservation and to route subsequent interfacing to the correct Pluto SDR corresponding to that reservation.
# for remotely interfacing with Pluto
from remoteRF.drivers.adalm_pluto import *
sdr = adi.Pluto(token='dUx6lG3I9lA') # token issued when making a reservation
After these two lines, the rest of a user’s Python script would follow exactly as if they were connected locally to a Pluto SDR via USB. This means they can rely on all existing documentation for the Pluto SDR, with the exception of the two line changes mentioned before. Let us thus walk through creating a user’s first Pluto script in Python.
A First Script using RemoteRF
As a first step, save the below Python script as main_my_first_remoterf_script.py or something similar.
Then, in a new terminal window/tab, run this script via the following.
python main_my_first_remoterf_script.pyIf that does not work, try the following instead.
python3 main_my_first_remoterf_script.pyThe below Python script serves as a useful example demonstrating how to setup a Pluto SDR and then transmit and receive signals with it via the RemoteRF platform.
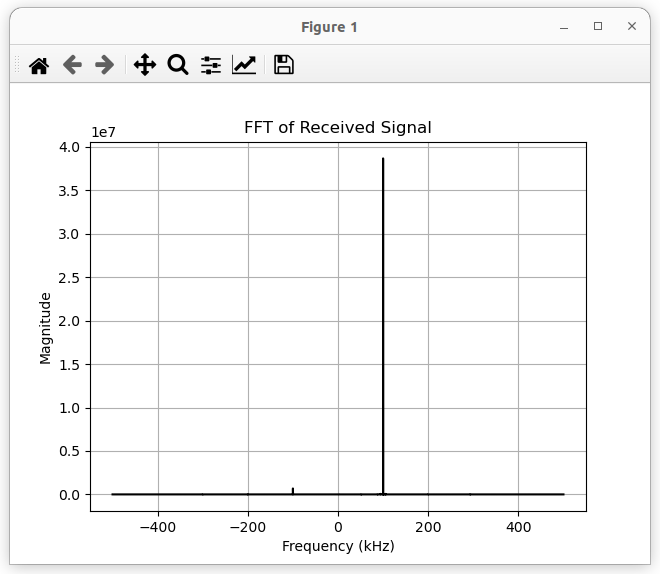
In this example, a complex sinusoid at 100 kHz is generated in Python and then sent to the Pluto SDR to transmit.
The complex sinusoid is upconverted to a carrier frequency of 915 MHz and then transmitted out of the transmit port of the Pluto SDR.
Since the transmit buffer of the Pluto SDR is set to be cyclic in this case (tx_cyclic_buffer = True), the Pluto SDR will continue transmitting indefinitely.
The command sdr.rx() then fetches complex baseband samples received by the Pluto SDR.
The FFT of these received samples are then plotted, showing a peak at 100 kHz as we would hope, as we are simply receiving the signal we transmitted.
Note that the two lines described in the previous step—which import our custom library and initialize an sdr object—have already been included in the code below.
You should not need to change any of the code below except for the token you received upon making a reservation.
import numpy as np
import matplotlib.pyplot as plt

# for remotely interfacing with Pluto
from remoteRF.drivers.adalm_pluto import *

# ---------------------------------------------------------------
# Digital communication system parameters.
# ---------------------------------------------------------------
fs = 1e6     # baseband sampling rate (samples per second)
ts = 1 / fs  # baseband sampling period (seconds per sample)
sps = 10     # samples per data symbol
T = ts * sps # time between data symbols (seconds per symbol)

# ---------------------------------------------------------------
# Pluto system parameters.
# ---------------------------------------------------------------
sample_rate = fs                # sampling rate, between ~600e3 and 61e6
tx_carrier_freq_Hz = 915e6      # transmit carrier frequency, between 325 MHz to 3.8 GHz
rx_carrier_freq_Hz = 915e6      # receive carrier frequency, between 325 MHz to 3.8 GHz
tx_rf_bw_Hz = sample_rate * 1   # transmitter's RF bandwidth, between 200 kHz and 56 MHz
rx_rf_bw_Hz = sample_rate * 1   # receiver's RF bandwidth, between 200 kHz and 56 MHz
tx_gain_dB = -25                # transmit gain (in dB), beteween -89.75 to 0 dB with a resolution of 0.25 dB
rx_gain_dB = 40                 # receive gain (in dB), beteween 0 to 74.5 dB (only set if AGC is 'manual')
rx_agc_mode = 'manual'          # receiver's AGC mode: 'manual', 'slow_attack', or 'fast_attack'
rx_buffer_size = 100e3          # receiver's buffer size (in samples), length of data returned by sdr.rx()
tx_cyclic_buffer = True         # cyclic nature of transmitter's buffer (True -> continuously repeat transmission)

# ---------------------------------------------------------------
# Initialize Pluto object using issued token.
# ---------------------------------------------------------------
sdr = adi.Pluto(token='dUx6lG3I9lA') # create Pluto object
sdr.sample_rate = int(sample_rate)   # set baseband sampling rate of Pluto

# ---------------------------------------------------------------
# Setup Pluto's transmitter.
# ---------------------------------------------------------------
sdr.tx_destroy_buffer()                   # reset transmit data buffer to be safe
sdr.tx_rf_bandwidth = int(tx_rf_bw_Hz)    # set transmitter RF bandwidth
sdr.tx_lo = int(tx_carrier_freq_Hz)       # set carrier frequency for transmission
sdr.tx_hardwaregain_chan0 = tx_gain_dB    # set the transmit gain
sdr.tx_cyclic_buffer = tx_cyclic_buffer   # set the cyclic nature of the transmit buffer

# ---------------------------------------------------------------
# Setup Pluto's receiver.
# ---------------------------------------------------------------
sdr.rx_destroy_buffer()                   # reset receive data buffer to be safe
sdr.rx_lo = int(rx_carrier_freq_Hz)       # set carrier frequency for reception
sdr.rx_rf_bandwidth = int(sample_rate)    # set receiver RF bandwidth
sdr.rx_buffer_size = int(rx_buffer_size)  # set buffer size of receiver
sdr.gain_control_mode_chan0 = rx_agc_mode # set gain control mode
sdr.rx_hardwaregain_chan0 = rx_gain_dB    # set gain of receiver

# ---------------------------------------------------------------
# Create transmit signal.
# ---------------------------------------------------------------
N = 10000 # number of samples to transmit
t = np.arange(N) / sample_rate # time vector
tx_signal = 0.5*np.exp(2.0j*np.pi*100e3*t) # complex sinusoid at 100 kHz

# ---------------------------------------------------------------
# Transmit from Pluto!
# ---------------------------------------------------------------
tx_signal_scaled = tx_signal / np.max(np.abs(tx_signal)) * 2**14 # Pluto expects TX samples to be between -2^14 and 2^14
sdr.tx(tx_signal_scaled) # will continuously transmit when cyclic buffer set to True

# ---------------------------------------------------------------
# Receive with Pluto!
# ---------------------------------------------------------------
sdr.rx_destroy_buffer() # reset receive data buffer to be safe
for i in range(1): # clear buffer to be safe
    rx_data_ = sdr.rx() # toss them out

rx_signal = sdr.rx() # capture raw samples from Pluto

# ---------------------------------------------------------------
# Clean up buffers once done receiving.
# ---------------------------------------------------------------
sdr.tx_destroy_buffer() # reset transmit data buffer to be safe
sdr.rx_destroy_buffer() # reset receive data buffer to be safe

# ---------------------------------------------------------------
# Take FFT of received signal.
# ---------------------------------------------------------------
rx_fft = np.abs(np.fft.fftshift(np.fft.fft(rx_signal)))
f = np.linspace(sample_rate/-2, sample_rate/2, len(rx_fft))

plt.figure()
plt.plot(f/1e3,rx_fft,color="black")
plt.xlabel("Frequency (kHz)")
plt.ylabel("Magnitude")
plt.title('FFT of Received Signal')
plt.grid(True)
plt.show()
Sample output upon running the above script is shown below. A peak is visible at 100 kHz, indicative of the transmitted complex exponential with frequency 100 kHz.
A Few Important Notes Regarding the Pluto SDR
Use Complex Signals
The Pluto SDR expects all baseband signals to be complex and may actually malfunction if this is not the case. As such, you will run into problems if you try to transmit and receive one-dimensional signals, like BPSK signals, M-PAM signals, or even real-valued sinusoids. Thus, it is advised to transmit either QPSK signals or complex sinusoids, at the very least.
Scaling Your Transmit Signal
As mentioned in the comments of the example code above, Pluto expects the real and imaginary components of transmitted signals to range from -2^14 to +2^14. As such, you should scale your transmit signal to occupy these bounds. Even if your signal is well within these bounds, the full range of the DAC will not be used and your transmitted signal will be not be full power unless you scale the signal up to occupy the entire range. I advise you to use these two lines when transmitting, where tx_signal is your signal before scaling.
tx_signal_scaled = tx_signal / np.max(np.abs(tx_signal)) * 2**14
sdr.tx(tx_signal_scaled)
Scale of Receive Signals
Received samples from Pluto will range from -2048 to 2048. If you see your signals clipping around +/-2048, you are saturating your receiver’s ADC. In other words, the signal entering the ADC is too strong for the ADC input range. You should decrease your receive gain and/or transmit gain in order to prevent this from happening.
Receive Gain Control
The Pluto has three options for receive gain control: manual, slow_attack, and fast_attack.
The latter two are forms of automatic gain control (AGC), which automatically adjusts the gain of the receiver’s front-end based on the strength of the received signal.
With manual, the gain of the receiver is fixed according to sdr.rx_hardwaregain_chan0 = rx_gain_dB.
By default, it is suggested that it be set to manual and then find a good receive gain level that is neither too low nor too high.
Flushing the Receive Buffer
It is not yet clear if this always absolutely necessary, but it seems to help to flush the receive buffer before receiving a desired signal.
To do this, I destroy the receive buffer with sdr.rx_destroy_buffer() and then call sdr.rx() at least once before receiving the desired signal.
sdr.rx_destroy_buffer() # reset receive data buffer to be safe
for i in range(1): # clear buffer to be safe
    rx_data_ = sdr.rx() # toss them out
Connecting to Multiple Pluto SDRs at Once
In some cases, a single Pluto SDR is sufficient to conduct basic experiments.
For more involved experiments, one may wish to use multiple Pluto SDRs, such as for transmitting from one Pluto SDR to another.
To accomplish this, all one needs to do is create multiple ad.Pluto() objects.
As a simple example, separate transmit and receive objects can be created as follows.
sdr_tx = adi.Pluto(token='dUx6lG3I9lA') # create transmitter object
sdr_rx = adi.Pluto(token='ajBMv80jMog') # create receiver object
Here, the token dUx6lG3I9lA corresponds to the particular device that was reserved when that token was issued, and ajBMv80jMog analogously.
Destroying the Transmit and Receive Buffers
To ensure the Pluto SDR does not continually transmit when it is not in use, add the following lines after receiving any necessary signals.
In other words, these lines should be placed after the final call of sdr.rx().
sdr.tx_destroy_buffer() # reset transmit data buffer to be safe
sdr.rx_destroy_buffer() # reset receive data buffer to be safe
If separate Pluto SDRs are being used for transmission and reception, then use the following.
sdr_tx.tx_destroy_buffer() # reset transmit data buffer to be safe
sdr_tx.rx_destroy_buffer() # reset receive data buffer to be safe
sdr_rx.tx_destroy_buffer() # reset transmit data buffer to be safe
sdr_rx.rx_destroy_buffer() # reset receive data buffer to be safe
Detailed Block Diagram of Pluto’s RFIC
A detailed block diagram of the AD9361 RFIC, used in the Pluto SDR, is shown below for reference.

Acknowledgments
Development of RemoteRF has been led by Prof. Ian Roberts and Ethan Ge, an undergraduate researcher in the Wireless Lab at UCLA. RemoteRF has been generously supported in part by UCLA’s Teaching and Learning Center’s Educational Innovation Grants program.